


SELECT YOUR MOUTHPIECE
5DS Total Performance & Wellness Core Mouthpiece Fitting Instructions
What You Will Need
- Microwave or stove
- Mug for hot water
- Mug of cold water
- Pot (if using the stove)
- Fork
- Timer (Phone)
- Mirror
STEP 1: MOLD THE MOUTHPIECE
- Bring the water to a full boil using either a microwave or stovetop.Microwave: Place a mug of water in the microwave and heat for approximately 3 minutes, or until the water reaches a full boil. ( keep an eye on it )Stovetop: Bring water to a full boil in a pot. Once boiling, remove the pot from the heat and carefully pour the boiling water into a mug. Never place the mouthpiece directly into a pot on the stove.
- Once the water has reached a full boil, place the mouthpiece into the mug and immediately start your timer for 35 seconds.
- Use a fork to remove the mouthpiece precisely at 35 seconds to avoid overheating.
- Allow the mouthpiece to cool for approximately 10 seconds, or slightly longer if necessary. (The mouthpiece may slightly distort and develop a rougher texture, and the connector bar may shrink slightly. This is normal.)
STEP 2: FITTING THE MOUTHPIECE
- Holding the mouthpiece with the NAP logo facing up, gently position it on your lower jaw, ensuring the connector bar rests behind your front teeth. Align it so that it starts at the back of your third tooth on each side. Use both hands and a mirror to adjust the mouthpiece until it is positioned correctly.
- Stick out only the tip of your tongue past your front teeth and gently bite down, ensuring your teeth come directly onto the top bite pads. Maintaining the tongue's “tip out” position, bite down firmly. (This is a crucial step in creating your personalized neuromuscular fit.)
- Bring your tongue back into your mouth and continue biting down with your mouth closed, creating suction around the mouthpiece while firmly molding the front and sides using your fingers. (See video above for details.)
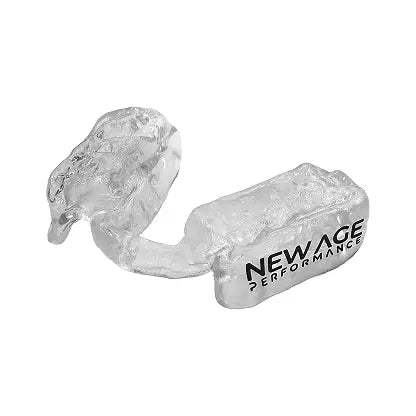
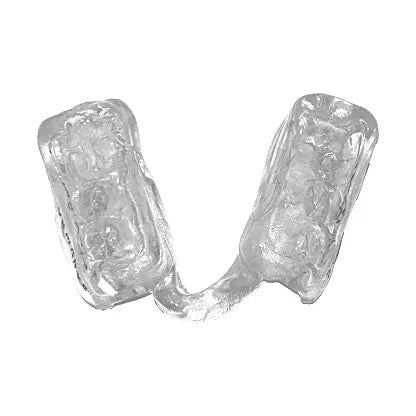
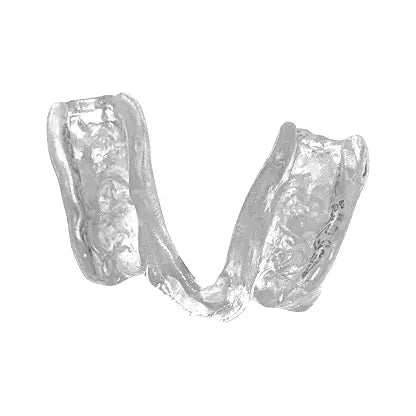
- Remove the mouthpiece and inspect it. You should see clear bite impressions on the top bite surfaces and within the lower tracks.
STEP 3: LOCK THE FIT
- If satisfied with the fit, place the mouthpiece into a mug of cold water to cool the material and lock in the shape. Your custom-fit mouthpiece is now ready to use.
- NOTE: If you are not satisfied with the fit, the 5DS Mouthpiece can be reheated and refitted. Simply repeat the same fitting process.
STEP 4: VERIFY YOUR FIT
Review the diagnostic images below. Your custom device should show deep, distinct structural teeth impressions.
If your mouthpiece does not show these clear anatomical impressions, the water may not have been hot enough or the heating/timing protocol may not have been followed correctly. Reheat and refit the mouthpiece using the instructions above until clear impressions are achieved.
6DS Heavy Lifting Mouthpiece Fitting Instructions
What You Will Need
- Microwave
- Mug of Hot Water
- Mug of Cold Water
- Fork
- Timer (Phone)
- Mirror
STEP 1: MOLD THE MOUTHPIECE
- Place the mug of hot water in the microwave for 90 seconds.
- Once it's done, remove it from the microwave and set your timer for 40 seconds.
- Put the mouthpiece into the hot water and start the timer.
- Use a fork to remove the mouthpiece precisely at 40 seconds to avoid over boiling.
- Allow the mouthpiece to cool for about 10 seconds or slightly longer if necessary. (Note the mouthpiece may have slightly distorted and developed a rougher texture while the connector bar may have shrunk. This is normal)
STEP 2: FITTING THE MOUTHPIECE
- Holding the mouthpiece with the NAP logo facing up, gently position it on your lower jaw, ensuring the connector bar rests behind your front teeth. Align it so that it starts at the back of your third tooth on each side. Use both hands to adjust the mouthpiece to fit correctly.
- Stick out only the tip of your tongue past your teeth and gently bite down, ensuring you bite directly onto the top bite pads. Then, maintain the tongue's “tip out” position and bite down hard. (This is a crucial step in activating your personal neuromuscular fit.)
- Remove your tongue and continue biting down gently with your mouth closed, creating a suction, while molding the front and sides using your fingers. (See video above for details).
- Remove the mouthpiece and inspect it. You should see bite marks on the top and between the bottom tracks.
STEP 3: LOCK THE FIT
- If satisfied, place the mouthpiece in a mug of cold water to lock in the shape. Your custom mouthpiece is now ready to use.
- NOTE: If you are not satisfied with the fit, you can refit the mouthpiece following the same instructions.
STEP 4: Verify Your Fit
Review the diagnostic images below. Your custom device must show deep, distinct structural teeth impressions. If your mouthpiece does not exhibit these clear anatomical definitions, your water was not hot enough or the timing protocol was missed. Without these impressions, your jaw is not locked into structural alignment and the desired wellness and performance effects will not be realized.
6DS HIIT Low Profile Mouthpiece Fitting Instructions
What You Will Need
- Microwave
- Mug of Hot Water
- Mug of Cold Water
- Fork
- Timer (Phone)
- Mirror
STEP 1: MOLD THE MOUTHPIECE
- Place the mug of hot water in the microwave for 90 seconds.
- Once it's done, remove it from the microwave and set your timer for 20 seconds.
- Put the mouthpiece into the hot water and start the timer.
- Use a fork to remove the mouthpiece precisely at 20 seconds to avoid over boiling.
- Allow the mouthpiece to cool for about 10 seconds or slightly longer if necessary. (Note the mouthpiece may have slightly distorted and developed a rougher texture while the connector bar may have shrunk. This is normal)
STEP 2: FITTING THE MOUTHPIECE
- Holding the mouthpiece with the NAP logo facing up, gently position it on your lower jaw, ensuring the connector bar rests behind your front teeth. Align it so that it starts at the back of your third tooth on each side. Use both hands to adjust the mouthpiece to fit correctly.
- Stick out only the tip of your tongue past your teeth and gently bite down, ensuring you bite directly onto the top bite pads. Then, maintain the tongue's “tip out” position and bite down hard. (This is a crucial step in activating your personal neuromuscular fit.)
- Remove your tongue and continue biting down gently with your mouth closed, creating a suction, while molding the front and sides using your fingers. (See video above for details).
- Remove the mouthpiece and inspect it. You should see bite marks on the top and between the bottom tracks.
STEP 3: LOCK THE FIT
- If satisfied, place the mouthpiece in a mug of cold water to lock in the shape. Your custom mouthpiece is now ready to use.
- NOTE: If you are not satisfied with the fit, you can refit the mouthpiece following the same instructions.
STEP 4: Verify Your Fit
Review the diagnostic images below. Your custom device must show deep, distinct structural teeth impressions. If your mouthpiece does not exhibit these clear anatomical definitions, your water was not hot enough or the timing protocol was missed. Without these impressions, your jaw is not locked into structural alignment and the desired wellness and performance effects will not be realized.
5DS Low Profile Contact Mouthguard Fitting Instructions
What You Will Need
- Microwave
- Mug of Hot Water
- Mug of Cold Water
- Fork
- Timer (Phone)
- Mirror
STEP 1: MOLD THE MOUTHPIECE
- Place the mug of hot water in the microwave for 90 seconds.
- Once it's done, remove it from the microwave and set your timer for 30 seconds.
- Put the mouthpiece into the hot water and start the timer.
- Use a fork to remove the mouthpiece precisely at 30 seconds to avoid over boiling.
- Allow the mouthpiece to cool for about 10 seconds or slightly longer if necessary. (Note the mouthpiece may have slightly distorted and developed a rougher texture while the connector bar may have shrunk. This is normal)
STEP 2: FITTING THE MOUTHPIECE
- Holding the mouthpiece with the NAP logo facing up, gently position it on your lower jaw, ensuring the connector bar rests behind your front teeth. Align it so that it starts at the back of your third tooth on each side. Use both hands to adjust the mouthpiece to fit correctly.
- Stick out only the tip of your tongue past your teeth and gently bite down, ensuring you bite directly onto the top bite pads. Then, maintain the tongue's “tip out” position and bite down hard. (This is a crucial step in activating your personal neuromuscular fit.)
- Remove your tongue and continue biting down gently with your mouth closed, creating a suction, while molding the front and sides using your fingers. (See video above for details).
- Remove the mouthpiece and inspect it. You should see bite marks on the top and between the bottom tracks.
STEP 3: LOCK THE FIT
- If satisfied, place the mouthpiece in a mug of cold water to lock in the shape. Your custom mouthpiece is now ready to use.
- NOTE: If you are not satisfied with the fit, you can refit the mouthpiece following the same instructions.
STEP 4: Verify Your Fit
Review the diagnostic images below. Your custom device must show deep, distinct structural teeth impressions. If your mouthpiece does not exhibit these clear anatomical definitions, your water was not hot enough or the timing protocol was missed. Without these impressions, your jaw is not locked into structural alignment and the desired wellness and performance effects will not be realized.